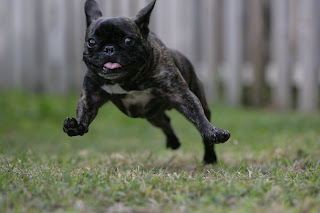
I captured this image of Grizzy running toward me so that I could try a Photoshop trick that simulates "rear-curtain sync". I'd watched an online video lesson by Rick Sammon who said that he always tries to shoot sharp images and then if he wants a certain effect he'll enhance the image later using Photoshop. His technique was easy to learn and I like the results. Here's how I did it in case anyone wants to give it a try.
I opened the image in Photoshop and duplicated the background layer. The first step was to click on FILTER>CONVERT FOR SMART FILTERS>FILTER BLUR>MOTION BLUR; in the MOTION BLUR DIALOGUE BOX, I adjusted the angle to 45 but you can choose whatever gives you the look that's best for your subject and I adjusted the speed just a little. When I closed the MOTION BLUR Dialogue Box, I went to the bottom of the tools panel on the left side of my Photoshop window and made sure that BLACK was selected for my foreground color. Then on the right side of the PS window, in the panel, I clicked on the empty SMART FILTERS BOX. Next, I selected a brush (small,soft) from the tools panel and set the opacity to 100 (opacity is at the top of the screen in the menu bar) Then I started painting Griswalds' eyes and face, working my way from the center of his face outward....as I got further away from his eyes (where the plane of focus would naturally change, I lowered the opacity to increase the blur and continued to do that to the edges of the photo.
So instead of shooting a lot of images at various slow shutter speeds, I took one sharp image and then created the motion blur that I wanted in Photoshop. I know that some photographers like to do as little post- processing as possible but in the process of developing a workflow and learning Lightroom I'm discovering Photoshop and it's a lot of fun.
If anyone tries this out on their photos let me know or if you have any tricks to share I'd love to try them.


